Enjoy benefits and new preview !
ZEBRA® DESKTOP ZPL PRINTER TROUBLESHOOTING GUIDE
To ensure that your Zebra printer continues to work efficiently and effectively, you need to understand the various indicators and testing procedures incorporated into the TlP and lP series printers. This guide explains those indicators and procedures.
INTERPRETING INDICATORS
The printer’s indicators display various printer functions and their statuses.
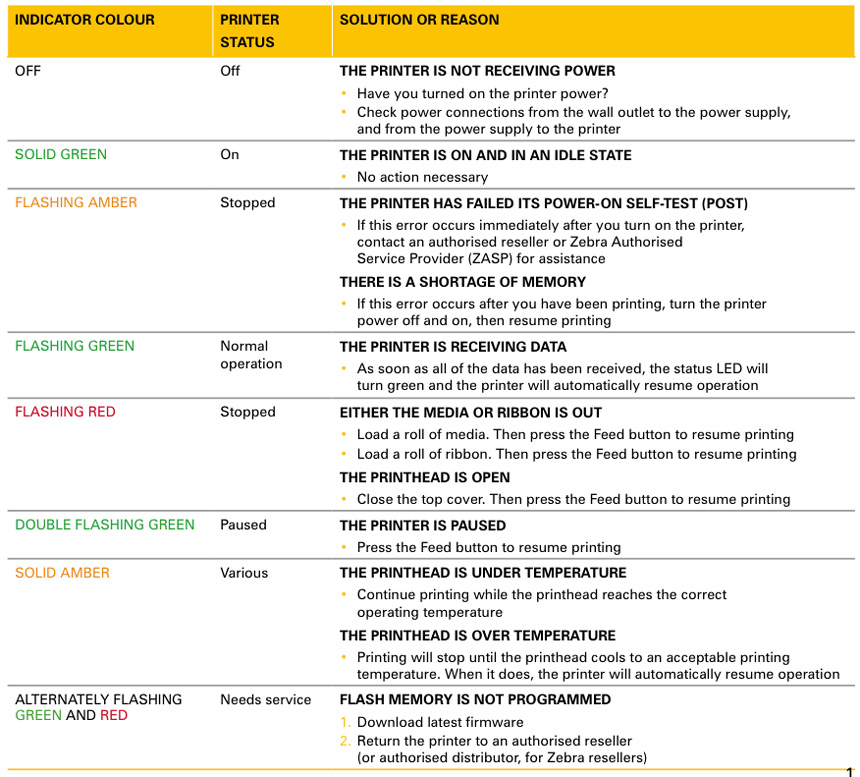
Identify the indicator status using the table below, then refer to the relevant troubleshooting topic overleaf.

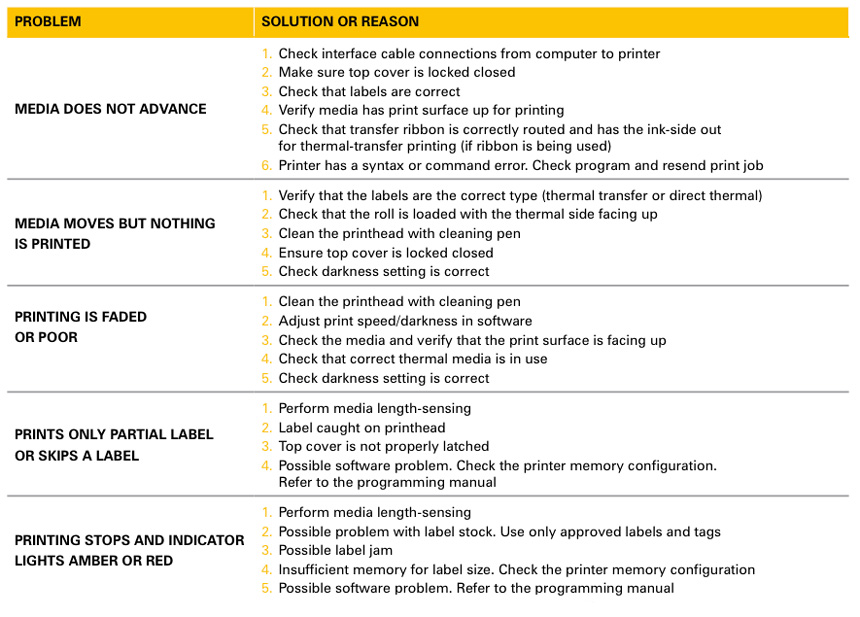
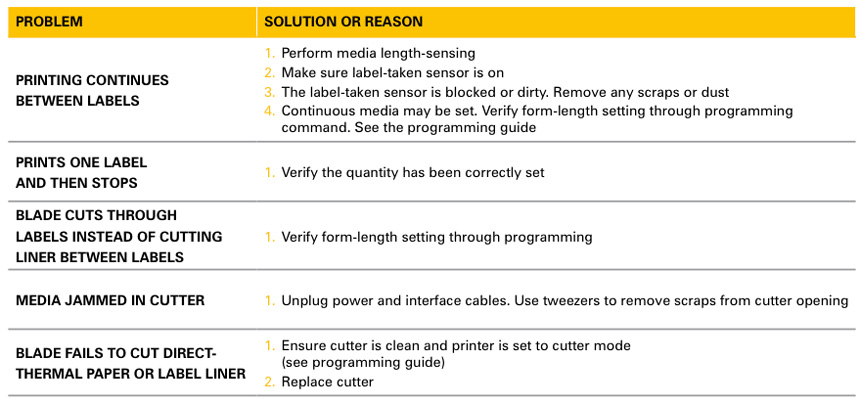
TROUBLESHOOTING TOPICS
PRINTER OPERATION

MEDIA HANDLING

MANUAL CALIBRATION
Manual calibration is recommended whenever you are using pre-printed labels (or label backing) or if the printer will not correctly auto-calibrate.Note: If printing in Direct Thermal Mode, default the printer first (four flashes).
- load the labels and ribbon (if used) and close the printer.
- Turn on the printer power.
- allow the printer to feed or error out.
- Press and hold the feed button until the green status led flashes once, then twice. release the feed button.
- The printer will set the media sensor for the label backing being used and then automatically feed until a label is positioned at the printhead.
- a profile of the media sensor settings (similar to the example below) will print. upon completion, the printer will save the new settings in memory and the printer is ready for normal operation.
- Press the feed button. One entire blank label will feed. If this does not happen, try defaulting (hold the feed button until it flashes four times).
NOTE: Performing a manual calibration disables the auto-calibration function. If you use varying label lengths, you can set the printer to measure the label length (using the Zebra driver or the ^Mf command) or return to auto- calibration by defaulting the printer. (To do this, hold the feed button until it flashes four times).
TROUBLESHOOTING TESTS
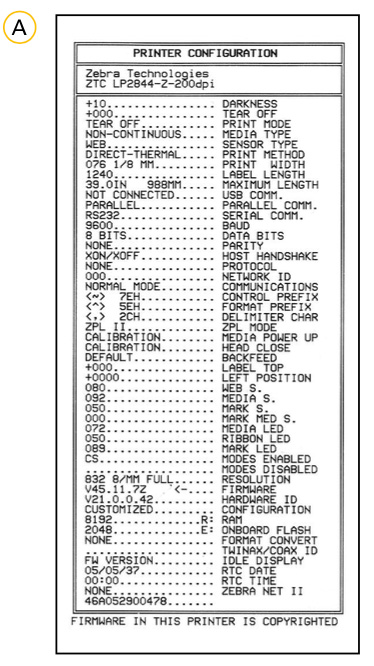
Printing a configuration label
To print a listing of the printer’s current configuration, follow these steps:
- Make sure the media is properly loaded and the top cover of the printer is closed. Then, turn the printer power on if you have not already done so.
- When the status light is solid green, press and hold the feed button until the status light flashes once.
- Release the feed button. The printer prints configuration information on the available media.
Refer to figure a for a sample configuration printout.

FEED BUTTON MODES
POWER-OFF MODE (COMMUNICATIONS DIAGNOSTICS MODE)
With the printer power off, press and hold the feed button while you turn on the power. The printer prints out a listing of its current configuration. after printing the label, the printer will automatically enter a diagnostic mode in which the printer prints out a literal representation of all data subsequently received. To exit the diagnostic mode and resume printing, turn the printer off and then on.
POWER ON MODES
With the printer power on and top cover closed, press and hold the feed button for several seconds. The green status led will flash a number of times in sequence. In the table below, the explanation in the right-hand column shows what happens when you release the key after the specific number of flashes.
| FLASH SEQUENCE | ACTION |
|
* |
A configuration label prints. |
|
* ** |
The media sensor calibrates and a media sensor profile prints (see “Manual Calibration”). |
|
* ** *** |
To reset the communication parameters, press and release the feed button while the led rapidly flashes yellow and green.For autobaud synchronisation, Send a ZPl II® format to the printer while the led rapidly flashes yellow and green. When the printer and host are synchronised, the led changes to solid green. NOTE: no labels will print during autobaud synchronisation. |
|
* ** *** **** |
Resets the factory defaults, auto-calibrates and saves settings into memory. |
|
* ** *** **** ***** |
The print width is calibrated. While the status LED alternately flashes green and yellow, a series of stacking rectangles prints on the label. When the rectangle prints to the outer edges of the label, press and release the Feed button. The label width and current communication parameters will be saved into memory. |
|
* ** *** **** ***** ****** |
The print darkness is calibrated. A series of nine samples prints, starting with the lightest and ending with the darkest image. When the desired print darkness is achieved, press and release the feed button. The print darkness will be saved into memory. |
If the feed button remains pressed after a seven-flash sequence, the printer will ignore the button when it is released.
Register to the Newsletter
ZEBRA Technologies
First 100% Zebra online store
The myZebra site is the online sales platform from ECE,
a specialist of Zebra products.
ECE has no tied what so ever to Zebra Technologies Corporation.


